Step-by-step plan: cuttings on perlite for beginners
Plant cuttings. It sounds so easy, and it is if you follow the right steps and have the right supplies. In this article we explain step by step how you can best take cuttings on perlite† What do you need? A transparent container (or vase), perlite, a sealable plastic bag, cling film or bell jar, secateurs or knife and disinfectant.
Table of contents
Step 1: Disinfect the blade or pruning shears
By removing part of the plant, a wound is created, as it were, on your plant and your cutting. When you disinfect your pruning shears or knife before use, the chance that bacteria will get into the wound is much less. In addition, there is also less chance of rot and other misery.
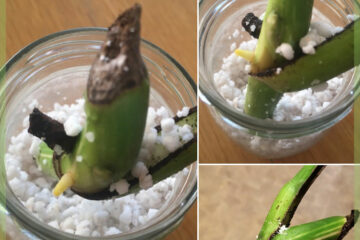
As an example for cuttings on perlite do we use the Monstera Adansonii.
Step 2: Cut or cut about 1 centimeter below an aerial root
Look in the photo below how a cutting with aerial root of the Adansonii looks like. Note: make sure that in addition to an aerial root (or nodule) there is also at least one leaf on the cutting.
In some cases there are two leaves close together or you have multiple aerial roots. That's no problem, you simply have a bigger spot!
The cutting formula for this plant is: leaf + stem + aerial root = cutting!
Step 3: Prepare your cutting tray with perlite
Now that you have made the cutting, you can use the cutting tray with preparing perlite.
The first thing to do is to clean the perlite† This can be done with tap water and, for example, a colander. Of course you don't want dirt or dust between the perlite, as this can hinder the air circulation in the cutting tray. You also want your perlite to be well moistened when it goes into the container or vase. This allows your cutting to continue to absorb moisture
Option 1: Fill your transparent tray with perlite† Add water until there is a layer of water at the bottom. This method is suitable for small cuttings. You can then carefully press the cutting in so that it is in the perlite.
Option 2: You can also choose to first fill the container about a quarter with perlite, then hold your cutting in the place in your container where it should be. This often works better when you have a larger cutting. Then fill with your free hand perlite until it has reached the desired amount and your cutting is secured in it. With this option you will of course also have to add water.
The water will later be absorbed by the perlite. So make sure you don't put too little in it.
Step 4: Ensuring High Humidity
Now that you have the cutting tray ready and your cutting in the perlite You only need to ensure good humidity. This humidity ensures that the cutting will grow faster and that the perlite remains moist.
Take the sealable plastic bag or use cling film and slide it around your cutting tray so that the opening is at the top. First open it once a day for about half an hour so that it can air out. If you prefer to use a bell jar, that is also possible.
Place the cutting tray in a place where it receives a lot of indirect light, but definitely no direct southern sunlight. If you have a grow light, it can also be placed under it. Also make sure that the room is not too cold, that hinders growth.
Step 5: Patience is a virtue!
Spray or pour with water as soon as the perlite looks dry or when you notice that the perlite is no longer moist. You can check this after 1 day after making your cutting. The next day it is best to keep checking this. In the long run you will know when the perlite can use some moisture or when it is best to ventilate. Because the environmental factors in every house are different, this will differ per person, per plant.
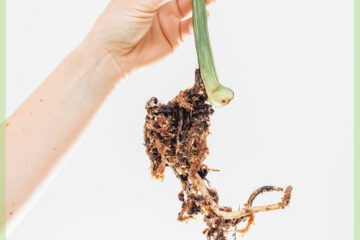
Step 6: Once the roots are at least 3 centimeters
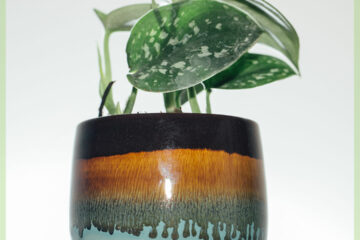
As soon as your roots are at least 3 centimeters you can transfer them to an airy potting soil mix! Each plant has its own favorite potting soil mix, so don't just put your young plant in the potting soil! The handy thing about the transparent bowl or vase is that you can see the roots in the end.
You can also keep them in perlite for a little longer, but if you do this for too long, the plants that need nutrition will not become more beautiful. Plants need nutrients that perlite and water do not. So it is best to repot them over time.
The advantages of cuttings on perlite are:
– Perlite is pH neutral, which means it is pure and will not hinder your cutting from growing.
– Perlite allows excess water to flow through and absorbs enough water, which promotes the growth of cuttings.
– Oxygen can get through the small holes of the perlite, so the cutting will always have enough of this. When cuttings on water alone, you have to take this into account, for example.
– Perlite is a natural product. It is a type of volcanic glass, which expands after heating into airy, lightweight grains; perlite granules. This means that it can also be used safely in combination with a heating mat.
– Perlite gives your cutting firmer roots, making it easier to switch to potting soil later on.